Tent Care 101: How to Seam Seal Your Tent

Tent Seam Sealing: A properly seam-sealed The North Face tent in the rain

In this post, we'll take a look at:

In this post, we’re going to explore the world of tent seam sealing. We’ll break it down into simple steps, so you can learn how to protect your tent like a pro.

No complicated jargon or technical terms – just straightforward advice to ensure your tent keeps you dry and comfortable on your outdoor escapades.

Interested? Let’s get started.

Key Takeaways

  • Tent seams need to be sealed to prevent water leaks. Some tents come pre-sealed from the factory, but seals can wear down over time and need re-sealing.
  • Use the proper seam sealer type – tape or liquid sealant – matched to your tent’s fabric material like polyester, nylon, or silicone-treated.

Understanding Tent Seams

Your tent is made of stitched-together sections, forming seams. Think of these seams as puzzle lines; without protection, they can allow rain to leak inside.

Here’s the deal: Some tents come from the factory already seam sealed, meaning they have that protective shield. Others might need extra sealing, especially those from smaller companies. But here’s a pro tip: even if your tent comes pre-sealed, it’s a good idea to reseam the seals regularly because they can wear down over time.

Types of Seam Sealers

Now, let’s talk about the different types of seam sealers you can use to fortify your tent’s seams. Imagine these sealers as the superpowers that keep your tent waterproof:

  • Tape vs. Sealant:
    • Tape: It’s easy to apply and often comes pre-applied on factory-sealed tents. However, it can be less durable and might peel over time.
    • Sealant: This glue-like chemical is super effective, and you can apply it yourself. It’s more durable but takes a bit more effort.
  • Matching to Your Tent’s Fabric: Different fabrics need specific sealers:
    • Polyester or Nylon with Silicone or Polyurethane Coating: These typically require a urethane-based sealer.
    • Silicone-Treated Fabrics: They need a silicone-based sealer. Dyneema falls into this category too.

Tip: You can discover the ideal seam sealer for your needs at REI.

Preparing for Seam Sealing

Before you dive into seam sealing, there are some important steps to get everything ready. Think of this as the pre-adventure checklist for your tent:

  • Setting the Scene: Find a dry, warm day to set up your tent. Check the weather forecast, as the sealant needs the right conditions to dry correctly.
  • Inspecting Seams: Examine all the seams carefully. If you spot any seam tape coming loose on the underside of the fly, gently peel it off, but leave intact tape in place.

How to Seam Seal Your Tent Using a Sealant

Tent Seam Sealing: A close-up of a person seam sealing a tent

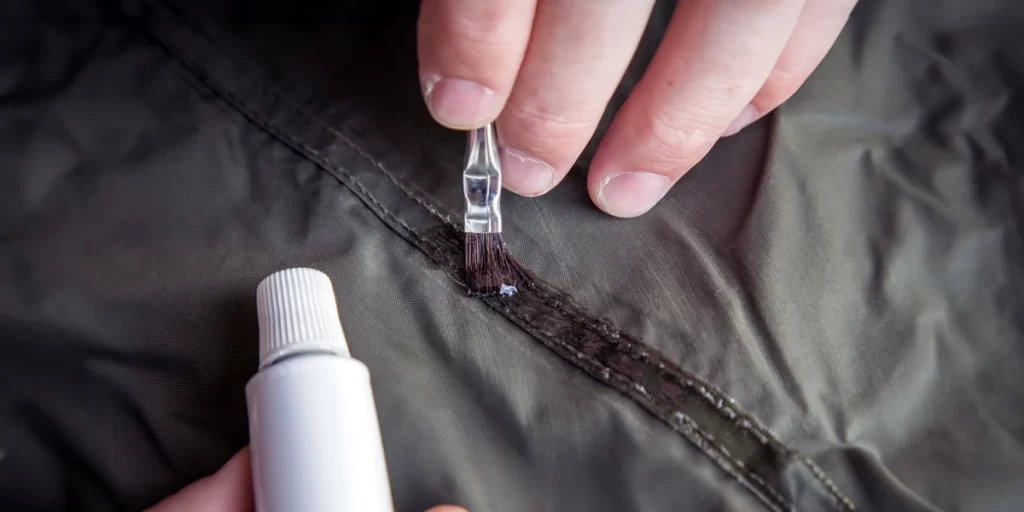
Now, let’s get down to business and explore how to seal those tent seams effectively. Here’s the step-by-step process to transform your tent into a waterproof fortress:

  1. Cleaning the Seams: Before applying the sealer, use a rag and rubbing alcohol to gently clean the seams. This prepares them for the new protective layer. Let the fabric dry for a few minutes.
  2. Protecting Sensitive Areas: Use painter’s tape to cover up zippers and any spots bordering mesh. This prevents accidental sealer application to these delicate parts.
  3. Applying the Sealant: Use the included brush to spread the sealer evenly along the inside of each seam. Don’t forget to seal all seams on the inner side of the tent body and the underside of the rainfly if applicable. Even if only a couple of seams need repair, do them all to save future hassle.
  4. Drying Time: Most sealants need about 24 hours to dry fully. Check the product’s instructions to be sure.
  5. Optional Testing: After the sealant has dried, you can give your tent a water test. Use a garden hose to give it a good spray and check for leaks. It’s better to find out now than in the middle of a sudden downpour on your trip

Tip: You can also use seam sealer to fix tiny holes in the tent fabric.

How to Make DIY Seam Sealer

Interested in budget-friendly tent seam sealing? Learn how to make your own DIY seam sealer with these materials and steps:

What You’ll Need:

  • A tube of clear 100 percent silicone caulk.
  • A bottle of mineral spirits.

How to Make Your DIY Seam Sealer:

  1. Mix It Up: In a separate container, mix the clear silicone caulk and mineral spirits thoroughly in a 50/50 ratio. You want the mixture to be like olive oil – thick enough to stick to the brush but not runny. If it’s too runny, add more caulk; if too thick, add more spirits.
  2. Application: Just like with a commercial sealer, apply a thin, even layer across the length of the seam.
  3. Drying Time: Allow it to dry for 24 hours.

This DIY solution can save you some cash, especially if you have multiple gear pieces in need of repair. Plus, you can use it to seal other foul-weather gear like rain jackets, pants, and mitts.

Conclusion

In this guide, we’ve simplified tent seam sealing, offering clear steps to keep your tent cozy and dry during outdoor adventures. Whether your tent is pre-sealed or not, regularly resealing the seams is a wise practice.

We discussed sealer types, prep, and the process, even sharing a budget-friendly DIY option. With these tips, you’re set for your next outdoor adventure, keeping gear in great shape and staying dry.


If you’re struggling to seam seal your tent and in search of a new ultralight shelter, explore our TOP 5 guides for the lightest options available.

FAQ

How long does seam sealing last?

The durability of seam sealing typically spans one camping season, approximately 3 to 4 months of continuous outdoor use. However, for the best results and long-term waterproofing, it’s recommended to inspect and potentially reseal tent seams every 1 to 2 years, depending on your usage frequency and exposure to challenging weather conditions. This proactive approach ensures that your gear remains in top-notch, waterproof condition throughout your outdoor adventures.

Do modern tents need waterproofing?

Modern tents usually feature factory-applied waterproof coatings, offering reliable protection for about 3 to 4 years. Over time, exposure and wear can reduce waterproofing effectiveness. To maintain it, inspect and reapply waterproofing products or seam sealing as needed after each camping season. This keeps your modern tent ready for dry outdoor adventures.

Spread the word →

Why you should trust us

At Hikinglite, we're all about helping you hit the trails with lightweight and ultralight outdoor gear that won't weigh you down. Our crew of content creators? Real outdoor enthusiasts who've logged countless miles on the trails.

Leading the pack is our editor-in-chief, Alex Jardine – an ultralight evangelist who's hiked over 10,000 trail miles across the globe. He's basically a walking outdoor encyclopedia. This dude loves testing out the latest and greatest products, so you can trust his recommendations are always well-informed and reliable.

We treat all our suggestions like advice from close trail buddies. No fluff, just real insights from folks who live and breathe the outdoor life.

Have any questions?

More Insights

Suscribe to Our Newsletter

Stay smartly informed with our weekly newsletter

Follow us

hikinglite logo white
© 2024 Hikinglite - All rights reserved

Subscribe to our newsletter

Subscribe now to stay ahead of the pack with the most up-to-date outdoor content.