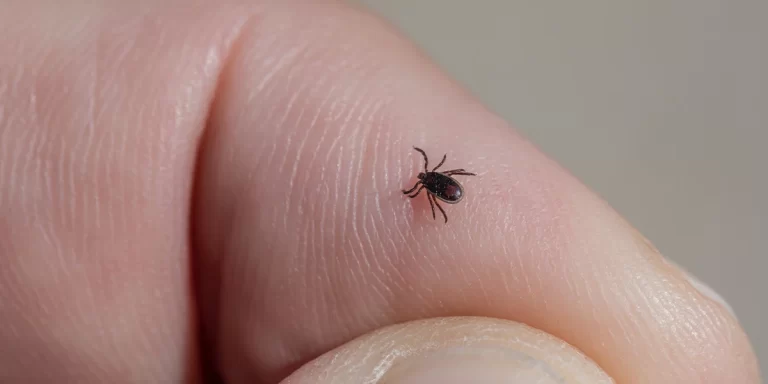
Outdoor adventures are thrilling but come with a potential hazard: ticks.
These tiny creatures can transmit diseases like Lyme Disease, making proper tick removal crucial for your safety during outdoor escapades.
In our ‘How to Use a Tick Removal Tool’ post, we’ll cover what these tools are, how to use them, and post-removal steps.
Let’s dive in.
Key Takeaways
Use a specialized tool designed for safe and precise tick removal, like fine-tipped tweezers or lightweight tick removers (e.g. O’Tom Tick Twister, tick removal cards).
Properly position and use the tool – grasp tick close to skin, apply steady upward pulling motion or twisting as directed, avoid squeezing tick’s body.
After removal – dispose of tick safely, clean bite area, monitor for symptoms, consider having tick tested if concerned about disease transmission.
Understanding the Tick Threat
Before diving into tick removal methods, it’s crucial to recognize the seriousness of the tick threat, especially for outdoor enthusiasts:
Disease Transmission: Ticks are significant disease carriers, with Lyme Disease being a top concern. Ticks rank second, after mosquitoes, in transmitting diseases to humans. While not all ticks are infected, the risk remains.
Other Tick-Borne Illnesses: Ticks can also carry diseases like tick-borne encephalitis and anaplasmosis, posing threats to humans. See the full list here.
Prevalence: The prevalence of tick-borne diseases varies by region. While Lyme Disease is more common in some parts of the US and Europe, it’s essential to be vigilant everywhere, as ticks are adaptable and can be active year-round.
For Europe, refer to the ECDC’s Tick maps for information.
So, what does this all mean if you get bitten? The risk of getting ill from Lyme disease from a single tick ranges from zero to about 50 percent. The probability depends on three factors: the tick species, its origin, and how long it was feeding.
Tick Removal Tools – A Closer Look
Conventional Tweezers vs. Lightweight Options
When it comes to tick removal, choosing the right tool is essential. Here, we explore the pros and cons of conventional tweezers and lightweight alternatives:
Conventional Tweezers:
Pros:
Effective.
Commonly found in households.
Robust and durable, can be sterilized.
Cons:
Bulkier and heavier, less suitable for ultralight backpacking.
Tips may not be fine enough for small ticks.
Risk of squeezing the tick, causing it to inject harmful bacteria.
Tweezers that are more than 2.3 in (6 cm) are not allowed to be carried on planes.
Lightweight (Specialized) Alternatives:
Pros:
Ideal for backpacking due to their small size and weight.
Most options are safe for travel on planes.
Fine-tipped options available for precise tick removal.
Less risk of squeezing the tick.
Cons:
May not always work as well for bigger ticks. However, if you’re on the trail and check yourself every night, you can catch them early for these tools to be very effective.
Exploring Lightweight Tick Removal Tools
For hikers and backpackers, trimming gear weight is vital, and lightweight tick removers are the solution.
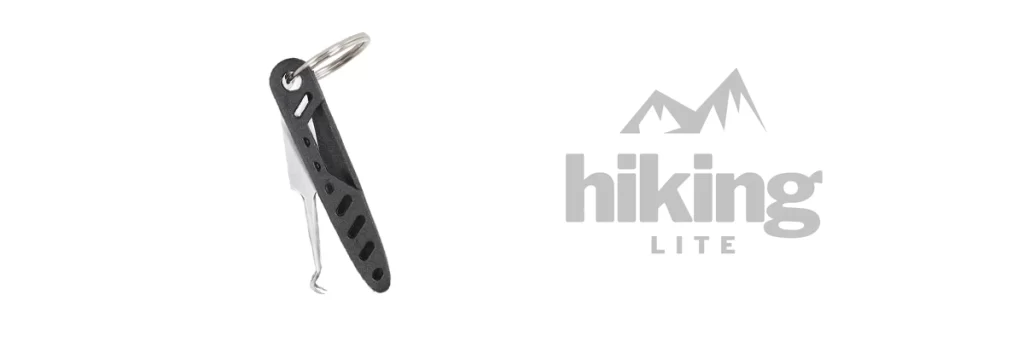
1. O’Tom Tick Twister:
Weight: A mere 0.07oz (2.2g) for a pair.
Advantages:
Small and lightweight.
Designed for safe and effective tick removal.
Suitable for various tick sizes.
Less risk of squeezing or stressing the tick.
You can find them at various retailers, such as Amazon, or directly on O’Tom’s website here.
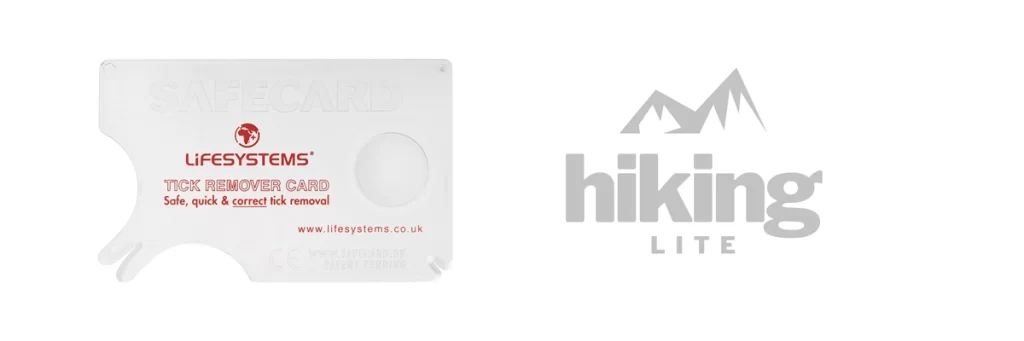
2. Tick Removal Cards:
Weight: Lightweight, typically less than 0.35oz (10g).
How to Use a Tick Removal Tool: Step-by-Step Instructions
Now that you’ve chosen the right tick removal tool for your outdoor adventures, it’s essential to know how to use it effectively. Follow these steps for safe tick removal:
1. Preparation:
Ensure you have your chosen tick removal tool readily accessible.
Find a well-lit area if possible.
Wash your hands and the affected area with soap and water. If possible use gloves.
2. Inspect the Tick:
Examine the tick’s size and location on your body.
Identify if it’s a small or large tick, as this may influence the tool you use. For instance, the O’Tom Tick Twister usually comes in two sizes.
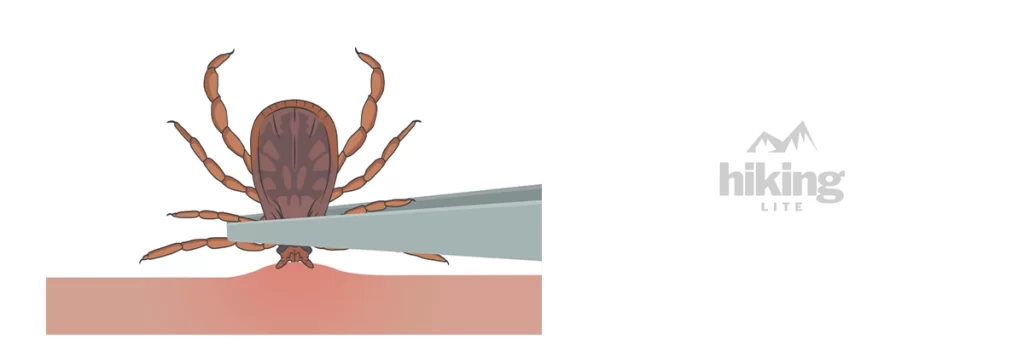
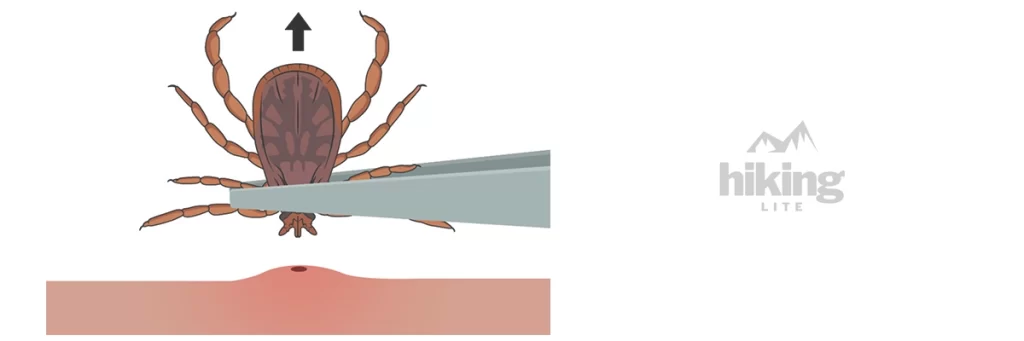
3. Position the Tool (Use Precaution):
If using specialized tweezers or tick cards, position the tool close to the skin, around the tick’s mouthparts (hypostome).
For O’Tom Tick Twisters, gently slide the tool under the tick, around its mouthparts.
4. Twist or Lift:
With tweezers or tick cards, gently and steadily lift the tick straight upward without squeezing.
If using O’Tom Tick Twisters, twist the tool in the direction indicated by the arrow on the handle.
5. Remove the Tick:
Continue twisting or lifting until the tick releases from your skin.
Avoid jerking or twisting abruptly, as this could cause the tick’s mouthparts to break off.
6. Dispose of the Tick:
Place the removed tick in a sealable plastic bag or container.
Save it for analysis if you experience any unusual symptoms later.
7. Clean the Bite Area:
Wash the affected area with soap and water.
Apply an antiseptic or disinfectant to the bite site.
8. Monitor Your Health:
Monitor the bite for signs of infection like redness or swelling.
Be vigilant for symptoms like fever, fatigue, or a rash, which could indicate a tick-borne disease.
In the next section, we’ll discuss the awareness and prevention steps during your hike.
Post Removal Steps
After successfully removing a tick, your responsibility doesn’t end there. Here’s what to do after the tick is gone:
Seal and Save:
Place the tick in a sealed plastic bag or container.
Label it with the date and the location where you were bitten.
Consider Analysis:
While not always necessary, tick analysis can aid early treatment and enhance recovery options. In the US you could use a service like the Tickreport.
Observe for Symptoms:
Keep a close watch on your health for the next few weeks.
Look out for symptoms such as fever, fatigue, muscle aches, or skin rashes, as these could be signs of tick-borne diseases.
Tick-Proof Your Gear:
Inspect your clothing and gear for any additional ticks.
Ticks can hide in folds, seams, and pockets.
Prevent Future Bites:
Use tick repellents (containing DEET or Picaridin) on skin and clothing.
Perform regular tick checks.
At the campsite, shower and inspect your body for ticks in key areas like under the arms, around the ears, inside the belly button, back of the knees, in and around hair, between the legs, and around the waist. Notably, check your feet and between toes for ticks.
Final Thoughts
This post is all about staying safe from ticks. Even though ticks can be risky, being aware and ready lets you enjoy nature safely. We talked about how ticks can carry diseases and knowing about the dangers in your area helps you stay protected.
Picking the right way to remove ticks and learning techniques gives you the power to handle them with confidence. What you do after removing a tick is important too, like sealing it, keeping an eye on symptoms, and checking your gear.
Using this knowledge helps you reduce the risk over time by being careful. Staying safe allows you to enjoy the outdoors for years to come. We wish you happy hiking and safe trails!
Searching for an ultralight headlamp for tick checks at camp? Explore our TOP 5 guide for the lightest options on the planet.
FAQ
What is the best tool for removing ticks?
The best tool for removing ticks, including lightweight options, is a fine-tipped pair of tweezers or specialized tick removal tweezers. These tools are not only effective but also convenient for outdoor enthusiasts, as they come in lightweight versions suitable for hiking and camping. Their precision ensures safe tick removal, minimizing the risk of infection.
How do I use a tick removal tool?
To use a tick removal tool, first grasp the tick as close to the skin as possible using fine-tip tweezers or a specialized removal tool like the O’Tom Tick Twister. Avoid squeezing the tick’s body. Next, pull upward with steady, gentle pressure or twist clockwise/counterclockwise depending on your tool’s design. Continue twisting or pulling until the tick releases its grip on the skin. Avoid any jerking or twisting motions that could cause the tick’s mouthparts to break off in the skin. The key is applying slow, steady pressure straight outward through light grasping and pulling or twisting motions. This allows safe removal of the entire tick.
How do you know if you successfully removed a tick?
To determine if you’ve successfully removed a tick, inspect the bite site carefully. After using a tick removal tool to detach the tick, check if the entire tick, including its mouthparts, has been removed from your skin. Ensure there are no remnants left behind. Additionally, the area around the bite should gradually heal without signs of infection, such as increasing redness or swelling. If you have any doubts or experience unusual symptoms after tick removal, it’s advisable to consult a healthcare professional for further evaluation and guidance.
Can I use a tick removal tool on embedded or engorged ticks?
Tick removal tools can remove embedded or engorged ticks, though it may be more difficult. Grasp the tick close to the skin and pull up steadily with gentle pressure. Specialized tools like the O’Tom Tick Twister provide extra grip for swollen ticks. With proper technique, you can fully remove an engorged tick. Monitor for infection, and seek medical attention if any mouthparts remain.
Spread the word →
Share
Facebook
Twitter
Email
Why you should trust us
At Hikinglite, we're all about helping you hit the trails with lightweight and ultralight outdoor gear that won't weigh you down. Our crew of content creators? Real outdoor enthusiasts who've logged countless miles on the trails.
Leading the pack is our editor-in-chief, Alex Jardine – an ultralight evangelist who's hiked over 10,000 trail miles across the globe. He's basically a walking outdoor encyclopedia. This dude loves testing out the latest and greatest products, so you can trust his recommendations are always well-informed and reliable.
We treat all our suggestions like advice from close trail buddies. No fluff, just real insights from folks who live and breathe the outdoor life.